
As an aspiring Combinator aficionado you will probably go through these two phases:
Phase 1: Awe. “Woah, I’m gonna build like the biggest, baddest, meanest synth evverr!“.
Phase 2: Sanity. “OK, that was fun… but now I want to create something truly useful“.
Combinators don’t have to be gargantuan, complex CPU hogs – they can be lean and efficient too. We’re going to continue with the theme we started in part one of this article and build a few more “replacement” Combinators; the term ‘replacement’ signifying that these Combinators can do everything that the original devices do, and then some – so why not let them replace the standard devices in your compositions?
The SuperSub

Here’s a Combinator based on dual Subtractors. We’ll call it SuperSub in honor of the legendary Roland Super JX, which was essentially two JX-8P synths in one machine. (Incidentally, the Super JX was one of Douglas Adams’ favorite synths, which ties in with the title of this article.). The JX-8P was perhaps not the most exciting of synths, as it had lower quality oscillators than predecessors such as the Juno-60, but once they stacked two of them together inside the JX-10 it transformed into a whole other animal.
The “Discovering twist” here is that the Combinator allows you to control the waveform selection on the Subtractors with the rotary controls, and the rotary controls can be controlled by CV. This means you can change waveforms using for example a Matrix sequencer, allowing you to build rhythmic Subtractor textures by sequencing waveform changes. To top it off, we’ll also add some instant fattening functionality: Unison, macro detune and stereo spread.
The SuperSub recipe:
- 1 Line Mixer 6:2
- 2 Subtractors
- 1 UN-16 Unison
- 2 Matrix sequencers
- 1 Spider CV
Audio routings
The line outs from the two Subtractors connect to channels 1 and 2 on the Line Mixer. The UN-16 Unison will be used as a send effect (not an insert as one might think), so we’ll just connect it to the Aux sends and returns on the Line Mixer.
CV/Gate routings
We’ve got a Spider CV here and we’ll be using it to split the the Note and Gate CV coming from the Matrix unit responsible for sequencing the notes. Connect Note CV on the Matrix to Split A – In, and Gate CV to Split B – In on the Spider CV. Then connect the Split A and B outputs to the Note and Gate CV inputs on the two Subtractors. Finally there’s the second Matrix which controls the Waveform selection on the Subtractors: Connect Curve CV to Rotary 3 on the Combinator. If you want to change waveforms on one of the Subtractors only, simply unplug this cable or disable its routing in the programmer.

Rotaries
Rotaries 1 and 2 will be controlling the Filter Frequency and Resonance parameters on both Subtractors simultaneously. Rotary 3 is for selecting waveforms – this will normally be done by the Matrix Sequencer, but it can be done manually too of course. Rotary 4 detunes the oscillators using different scales – detuning Osc 1 up and Osc 2 down, spreading evenly so that you’ll get max detune values of -25 and +25 on Subtractor A and -50/+50 on Subtractor B.
Buttons
Button 1 toggles the mode on the UN-16 Unison between On and Off (not Bypass, as this would amplify the signal). Button 2 will pan the first Subtractor full left and the second Subtractor full right – this is handy if you’re using the same patch on both Subtractors to create a stereo sound – with the detuning, the Unison and stereo spread you can get a really wide sound quickly. Button 3 switches the Wave sequencer On/Off, and Button 4 toggles the Note sequencer On/Off.
Combinator Programming
Most of the programming here deals with the two Subtractors. Rotaries 1, 2 and 3 should be programmed identically for both synths. Rotary 1 controls Filter Freq, Rotary 2 controls Resonance – pretty straightforward stuff.
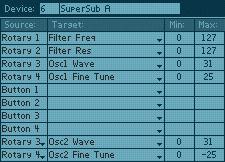
Rotary 3 is controlled by a Matrix unit and its job is basically to convert Curve CV data to Waveform selection. It should therefore be assigned to the parameters “Osc1 Wave” and “Osc 2 Wave” with the values Min 0 / Max 31 (there are 32 waveforms in total).
Rotary 4 will control the parameters “Osc1 Fine Tune” and “Osc2 Fine Tune”.
We’ll use four different sets of values here in order to detune each of the four oscillators differently. Subtractor A – Osc1 Max 25, Osc2 Max -25. Subtractor B – Osc1 Max 50, Osc2 Max -50. The Min value should be 0 for all four. That takes care of the Subtractors, but there are a few items left – the buttons.
In the Unison modulation routing panel, create a simple On/Off function by routing Button 1 to “Enabled”, Min 0 / Max 1.
For the 6:2 Mixer, there should be two entries for Button 2: “Channel 1 Pan” Min 0 / -64 and “Channel 2 Pan” Min 0 / Max 63. This is the “spread” function which is obtained by simply panning the two Subs hard left and hard right. For the Matrix that selects waveforms, route Button 3 to “Pattern Enable”, Min 0 / Max 1.
Finally, on the note sequencing Matrix unit: Button 4, “Pattern Enable”, Min 0 / Max 1.
This is the SuperSub, skinned, sealed & delivered: subersub.cmb. Now let’s see what it can do.
moving_mongolia.rns – We loaded the factory patches “Outer Mongolia” and “Cloud Chamber” into the Subtractors and enabled all the SuperSub extras; heavy detuning, unison and spread. On the first 8 bars, the Waveform Sequencer is disabled. It kicks in at bar 9, after which you can hear a major difference in the way the texture moves and evolves. Exercise: Try loading other pad sounds from the factory bank into the Subtractors. The waveform sequencer will keep going. You can stumble upon great sounds by simply doing this.
80s_super_dance_lead.rns – a heavily detuned, old school techno lead patch. Exercise: Remove all the extras progressively. Switch off the spread and the unison, and set detuning to zero. Finally, Mute one of the Subtractors. Notice what a day-and-night difference a little layering and FX magic can make.
annoying_man.rns – a buzzy, glitchy sound with a dash of distortion. The waveform sequencer is running a randomized pattern. Exercise: With the sequencer playing, open the curve display on the “Wave Seq” Matrix and experiment with drawing different curves by just click-dragging arbitrarily across the display. Endless variations there.
squaretooth_bass.rns – this is a bass sound that alternates between sawtooth and square wave on every 1/8 note, to showcase a slightly more organized way of using the waveform sequencer. Exercise: Experiment with the setting on the 3rd Combinator knob “Waveform 1-32” while the pattern is playing. Notice how the waveforms change, but the sequencer keeps alternating between two adjacent waveforms.
ReDrum D / A / G


ReDrum D, A and G are three different Combinators based around Matrix sequenced ReDrum units. D is for Dual, A for Analog and G for Graintable. ReDrum A emulates an analog drum machine, with one Subtractor for each ReDrum channel. ReDrum G is similar, but uses Malströms instead of Subtractors. We will go through the D model in detail; the other two are bonus patches that you can download and explore on your own.
Playing ReDrum with Matrix sequencers is great because you get one independent pattern sequencer for each drum channel, meaning you can have individual pattern length and time resolution for each drum. You also get a finer velocity resolution (0-127) than with the internal ReDrum sequencer (0-3) – and last but not least, it’s much quicker to draw Matrix patterns than to enter them in the ReDrum sequencer.

You can have one Matrix unit for each of the ten ReDrum channels, of course, but this is likely overkill. It’s more practical to use the internal ReDrum sequencer for those sounds which have little or no variation, while using separate Matrix sequencers for the snare and bass drum, for example. In our example Combinators we’ve put three Matrix sequencers (for bass drum, snare drum and closed hi-hat), but you can add more if you like.
The ReDrum D (Dual) uses two ReDrum units that are linked via Gate, so that channel 1 on ReDrum B is triggered by channel 1 on ReDrum A. This allows you not only to layer two samples per channel, but also to make velocity gradients between the two samples.
The ReDrum D shopping list:
- 1 Mixer 14:2
- 2 Spider Audio
- 2 Redrum
- 3-10 Matrix Sequencers
Audio routings
Since we’re dealing with 10+10 ReDrum channels here, we ought to need 20 mixer channels. Of course we could have two 14:2 mixers, or add a 6:2 mixer and get a total of 20, but we want to keep this one lean. So let’s see. It makes sense to merge ReDrum channels 8 and 9 into one mixer channel, as they’re intended for closed and open hihat. Then we could also merge channels 3-5, the tom channels, into one. That leaves a total of 7 outputs per ReDrum unit, 14 channels, precisely what we have.
Now, the routing isn’t very complicated but it’s a loooot of cables back there so we need some guidance through the jungle.
First, channel 1 (BD) of the “Master” ReDrum goes to mixer channel 1. Channel 1 of the “Slave” ReDrum goes to mixer channel 2 (it’s more practical to have these ‘pairs’ next to each other on the mixer). Then there’s channels 3-5, which we were going to merge. Since the Main Output on a ReDrum gets all the leftover channels that aren’t routed via individual outputs, and all ReDrum channels except 3-5 will indeed be routed via individual outputs, this means ReDrum is already merging channels 3-5 for us on the Main output.
So, connect Main Out on the Master ReDrum to mixer channel 3, and Main Out on the Slave ReDrum to channel 4. Now onto ReDrum channels 6 and 7. These will be routed to the mixer as follows: ReDrum Master 6 to Mixer 7. ReDrum Slave 6 to Mixer 8. ReDrum Master 7 to Mixer 9. ReDrum Slave 7 to Mixer 10. Now for the hihat channels 8+9. These will need to be merged with Spider Audio. Take channels 8+9 on the Master ReDrum and route them to Spider Audio #1. Do the same for the Slave ReDrum and Spider Audio #2. Then take the merged output from Spider #1 and route it to mixer channel 11, and from Spider #2 to mixer channel 12. Finally, connect Master ReDrum channel 10 to Mixer channel 13 and Slave ReDrum channel 10 to Mixer channel 14. Phew. What do we have on the mixer now?
Channels 1-2: Bass Drum A+B.
Channels 3-4: Snare Drum A+B.
Channels 5-6: Lo/Mid/Hi Toms A+B.
Channels 7-8: Perc 1 A+B.
Channels 9-10: Perc 2 A+B.
Channels 11-12: Hihat Open/Closed A+B.
Channels 13-14: Cymbal A+B.
CV/Gate routings
Two issues to deal with here: 1) The Master+Slave routing between the two ReDrums, 2) Matrix routing. First, you need to connect Gate Out on each of the 10 channels on the Master ReDrum to Gate In on each of the channels on the Slave ReDrum. Many cables, but easy. Then there’s the Matrix routing. As mentioned earlier, we only have 3 Matrix units in this example, but you can fill up with more if you need’em. Either way, the routing is simple: Just connect Gate Out on the Matrix to Gate In on the Master ReDrum channel you want to control.

Rotaries/Buttons
- Simple stuff. The Combinator panel buttons 1-4 and rotaries 1-4 will act as four pairs, with the button starting and stopping a sequencer and the rotary selecting patterns on that sequencer.

Combinator programming
- Not much! Each Rotary will be assigned to “Pattern Select”, Min 0 / Max 31. Each Button will be assigned to “Pattern Enable”, Min 0 / Max 1. You will need to enter this four times, for the Master ReDrum (button 4/rotary 4) and the three Matrix sequencers (buttons 1-3/rotary 1-3). That’s all there is to it.
And, as promised, ReDrum A (Analog): redruma.cmb and ReDrum G (Graintable): redrumg.cmb. Play around with these if you ever get tired of sampled drums! And enjoy what little is left of the summer!
Text & Music by Fredrik Hägglund


