
There’s one thing you’ll never hear when synthesiser enthusiasts wax lyrical about their instruments: an argument about which has the sweetest or fattest high-pass filter. They’ll debate endlessly the benefits of Moog’s discrete component low-pass filters, argue about the pros and cons of CEM and SSM low-pass filter chips, and possibly come to blows over whether the 12dB/octave low-pass filter in the early ARP Odysseys is better or worse (whatever that means) than the 24dB/octave low-pass filter in the later models. But nobody ever got punched because they insulted someone’s high-pass filter.
What’s more, there was a time when you had to work quite hard to find a high-pass filter on an integrated (i.e. not a modular) synth. The groundbreaking instruments of the late ’60s and early ’70s – Minimoogs, ARP2600s and EMS VCS3s – didn’t have them and, by and large, it was left to emerging manufacturers such as Korg, Yamaha and Roland to bring them to the public’s attention.
So why is the high-pass filter such a poor relation when compared with its twin, the low-pass filter? To understand this, we again have to consider the nature of natural sounds.
Let’s pluck, hit, blow into, or otherwise excite something!
Before electronic instruments were invented, non-vocal sounds were generated by exciting physical objects in some fashion. This usually involved blowing into them (brass, woodwind and organs), plucking them (guitars and harpsichords), smacking them with lumps of wood or hammers (drums, percussion and pianos) or scraping abrasive substances across them (violins, ‘cellos and so on). But while all of these instruments are very different and can sound very different, they all abide by the laws of physics, which means that they share a number of important characteristics, two of which I’ll outline here.
Charateristic #1:
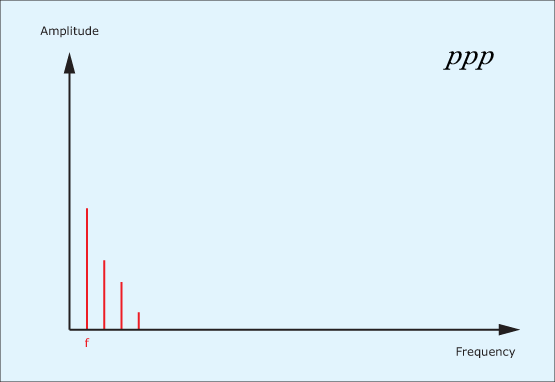
Let’s imagine that you excite any one of the above by plucking it gently, blowing into it softly, hitting it lightly, or whatever is appropriate. The resulting spectrum may look like figure 1, in which the lowest signal components are prominent, and the higher ones contribute little or nothing to the tone.
Now let’s imagine that you pluck, blow or hit it somewhat harder. In almost every case (with a few esoteric exceptions) not only will the previous signal components be louder, but higher frequency components will be introduced, so this might result in the spectrum shown in figure 2.

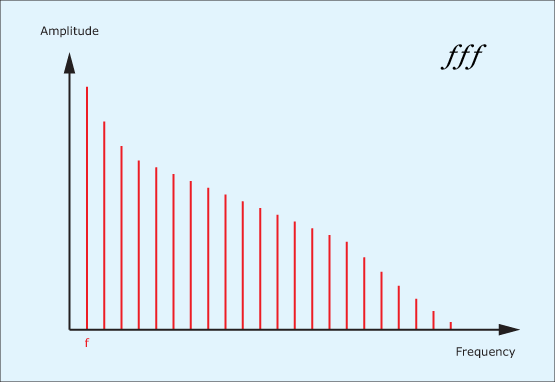
Finally, let’s go a step further and excite the thing really energetically. As you would expect, the instrument becomes louder still but, in addition to this, even more high frequency components are introduced. (See figure 3.)
This means that, the louder you play an acoustic instrument, the greater the proportion of the sound is contained within high frequency components. In other words, when the sound of an acoustic instrument becomes louder, it also becomes brighter.
Characteristic #2:
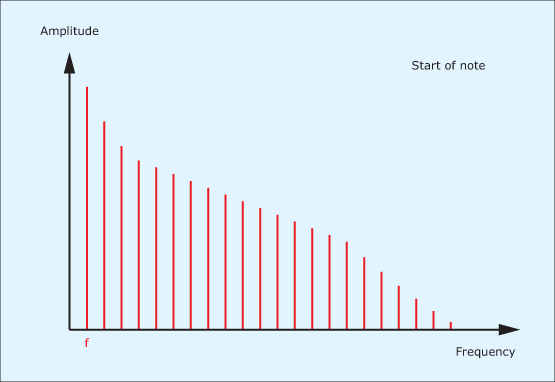
Let’s now imagine that you have played a note on an instrument with a nice, long decay – say, a bass note on a piano &ndash and that you are listening as it fades gently to silence. At the moment that you play the note, it will be bright to the degree determined by how hard you hit it. Consequently the spectrum (ignoring enharmonics and hammer noise) might look like figure 4.
Now hold the note and listen carefully as time passes. You will hear that the highest frequency components in the sound fade away quite rapidly and that the note quickly becomes warmer and rounder. (See figure 5.)

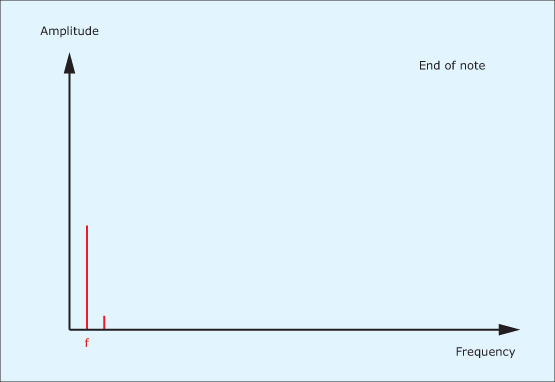
Finally, the middle frequencies will dissipate, and before the note decays to silence you’ll be left with just a deep, rolling bass sound (see figure 6) with few if any overtones. This is true of all acoustic instruments: the energy in the high frequencies components is dissipated more rapidly than the energy in the low ones.
These examples explain why the low-pass filter lies at the core of a traditional, subtractive synthesiser: if you start with a bright waveform that contains all the signal components you might ever need, you can use the filter to attenuate or even eliminate the higher frequencies in ways that emulate sounds in the real world. Characteristic #1 is achieved by making the filter’s cut-off frequency velocity-sensitive. Characteristic #2 is achieved by controlling the cut-off frequency using a contour generator. Other characteristics can be achieved by making the cut-off frequency proportional to the pitch of the note, or by modulating it using a low-frequency oscillator… and so on.
So it’s clear that the low-pass filter is an essential element in synthesising many sounds. But what of the high-pass filter? Is there no equivalent explanation that shows that we can’t live without them? In truth, there are some instruments in which the amplitudes of the low frequency components alter according to how you play them, but these are minor effects when compared with the changes in the high frequency components, so many of the greatest synths ever built don’t bother with high-pass filters at all.
A high-pass filter sound
One exception to this is the ARP Odyssey, released in 1972, which has a static high-pass filter lying between its low-pass filter and its amplifier. In this context, ‘static’ means that the filter cut-off frequency does not track the pitch of the note, nor is it affected by any controllers such as contour generators, low-frequency oscillators, joysticks, the velocity with which you play, and so on. You can only raise the cut-off frequency manually to attenuate the lower frequencies to the degree that you want. Interestingly, the Odyssey Patch Book illustrates a couple of patches in which the timbre of the sound is determined not by its low-pass filter (whose cut-off frequency is set to its maximum frequency and is, to all intents and purposes, inactive) but by its high-pass filter, whose cut-off frequency is set to its maximum frequency and is, therefore, maximally active. These are a violin patch and a clavinet.
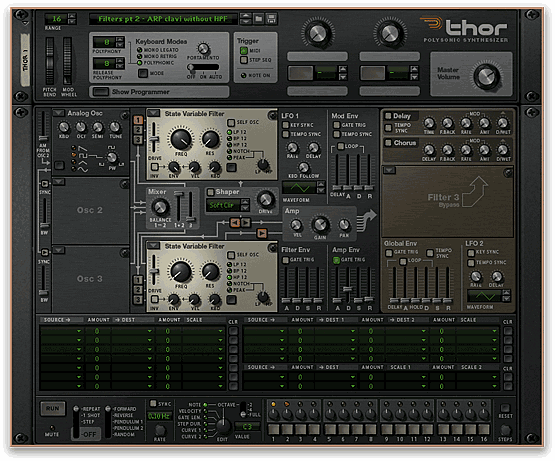
To emulate the original Odyssey’s filter architecture in Thor I’m going to place a low-pass filter (the LP12 option in the State Variable Filter) in the Filter 1 slot and a high-pass filter (the HP12 option in the State Variable Filter) in the Filter 2 slot. Now I’m going to direct the output from the oscillator to Filter 1, then the output from Filter 1 to Filter 2, and lastly the output from Filter 2 to the amplifier. You can set this up with just a couple of clicks on the appropriate red arrows beneath the Shaper controls. (See figure 7.)

To make the high-pass filter static as on the Odyssey, you must set the ENV, VEL and KBD knobs to zero to ensure that it doesn’t respond to any of these controllers. Having done so, and provided that there are no applicable routings in the modulation matrix, you will only be able to determine the cut-off frequency (and, therefore, the amount of low frequency attenuation) by turning the filter’s FREQ knob to the desired position.
Having prepared the architecture of the patch in this way, I’m going to start recreating the Odyssey’s “Wonder Clavinet” by placing an Analog oscillator in the Osc1 slot. The source waveform for a Clavinet sound is a moderately tight pulse wave, and I have used a value of 29 for the following samples. The shape of the sound – as determined by its amplitude envelope – is a simple AD contour with instant Attack and a much more rapid Decay than one would use for other keyboard instruments such as pianos.
Figure 8 shows this patch with the cut-off frequency of the low-pass filter at maximum and the cut-off frequency of the high-pass filter at minimum so that both have minimal effect. From this, we obtain Sound #1; simply a pulse wave whose amplitude has been shaped by a dynamic amplifier:
In fairness, this sound already exhibits much of the character of a Clavinet, but it’s altogether too thick and bass-heavy, so the next stage is to attenuate the bottom end by increasing the cut-off frequency of the high-pass filter. On the Odyssey, this was accomplished by pushing the slider all the way to its maximum, but in Thor this would be too extreme, and I found that a value somewhere in the middle of the FREQ range is quite pleasing. Having done this, you’ll find that, to maintain a similar loudness to the previous sample, it will be necessary to increase the output gain to compensate for the loss of ‘body’ in the sound. Figure 9 illustrates this, and you can hear the result in Sound #2:
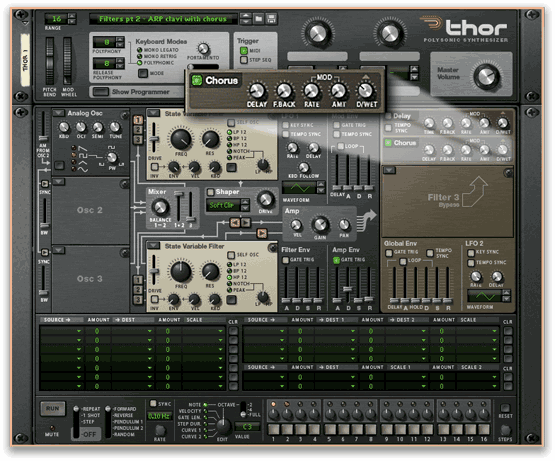
This is a huge improvement and, while I am loathe to mess around with it too much, I would like to show you a trick for emulating the delicate, natural chorusing of stringed instruments such as the Clavinet. Well… it’s not much of a trick, because you just add a tiny amount of chorus! This can be seen in figure 10, and you can hear the result in Sound #3:
Because the low-pass filter is (in theory) doing nothing in this patch, you can remove it from the signal path by setting the Filter1 slot to “Bypass”. If you do so, you might be surprised to find that the resulting sound is even brighter and more realistic than before. This is because, as I explained in my previous tutorial, the cut-off frequency is the point at which the filter is already attenuating the signal by 3dB so, even when this is set to its maximum, the filter is having a significant effect on signal components from (say) 10kHz upward. Removing it allows the high frequency components of the pulse wave to shine through unaffected, so the sound now sparkles in a way that was never possible on many analogue synths:
Before leaving this sound, I would like to show how filters can mess with the relative phases of the signal components in a sound. To prove this with maths and diagrams goes beyond the scope of the tutorials, so I’ll demonstrate it instead. I can do so by inserting two instances of Thor into Reason. Into the first, I insert the Clavinet patch in figure 10. Into the second, I insert the same patch but with no low-pass filter in the signal path. If I now play the same sequence as before, and you can hear the characteristic “out of phase” sound of some Clavinet pick-up combinations:
High-pass filtering the brass sound
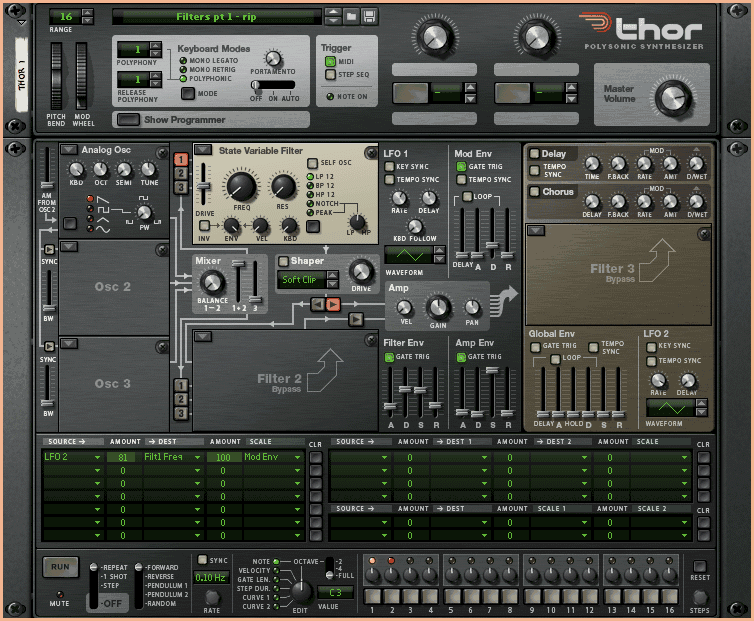
The example above has illustrated what we can achieve without using a low-pass filter to modify the timbre of an initial sound. But let’s now investigate what can happen when we add a high-pass filter to a patch whose essential timbre is determined by a dynamically controlled low-pass filter. To demonstrate this, I’m going to return to the “Penny Lane” trumpet that I created for the previous tutorial, presented here in figure 11 and Sound #6:
(Click to enlarge)
Continuing with the State Variable Filter and the architecture that I used to create the Clavinet, I can insert a high-pass filter into the trumpet patch as shown in figure 12, and turn its cut-off frequency knob to maximum so that it severely attenuates the low frequency components in the sound. You might expect this to create a rather unnatural tone, but that’s far from the case. In fact, it emulates the action of a ‘mute’, a device that brass players insert into the bells of their instruments to modify their timbres. Again, you must increase the amplifier gain to compensate for loss of body in the sound but, other than that, the two patches are identical. You can hear the result in sound #7:

(Click to enlarge)
Of course, these examples are far from the full extent of what high-pass filters can do for you. Ignoring all the sound effects and “synth” patches that they can help to create, static high-pass filters are often used to synthesise violins, harps, banjos, and percussion instruments such as hi-hats and chimes. But this is still far from the limit of their usefulness. Just like low-pass filters, high-pass filters can be made controllable, responding to all manner of modulation generators and physical controls. And, like low-pass filters, they can also be made “resonant”, which is where we will start the next tutorial.
Text by Gordon Reid


